Friday, October 14, 2011

Orders Filled!!

While my giveaway was going on...I was busy finishing up some orders.  And since then, I've managed to pick up a few more!  WHEW!!  I am so grateful for the extra income, but it sure makes me SUPER BUSY!!  This week has been one of the busiest by far!  And that is with NO SEWING projects involved!  Between TWO field trips, one Dr. appointment, preparing and having my first GS Daisy meeting, and preparing for my month to do a craft with my daughter's GS Junior Troop...I have been on-the-go EVERY day!!  So today I have vowed to stay home in my PJs ALL DAY!!!  Not that I am not still busy...finishing up the Junior Troop's craft preparations, a birthday hat order, a banner for my Kindergarten teacher's upcoming Nursery Rhyme day, some Nursery Rhyme character cut outs for my Symposium Tent...that my Kindergarten teacher will also use for props, and LAUNDRY!!  Lots and LOTS of LAUNDRY...GAH!!  I feel a few more gray hairs growing in as.I.type!!

Anyway, enough with all my yanh-yanhing!!  On with the orders I've manage to complete...


One of my Big Boy's best friends became a proud Poppa at the end of last month, and my son was named "Godfather".  He placed this order at the last minute...what? OF COURSE I made him pay me!!  My time is money...even for my children...HA!  But believe me, he got a HUGE discount! ;)


This is a 30" x 30" palette "quilt" with no batting, but a fleece backing.  The baby's name and birth date were quickly machine embroidered...when I got the information!  I really like how the paw prints from the fleece show through to the front!


I added a little initial applique burp cloth...for no charge!  The daddy was sooo excited about his new little baby's gift, that he called to thank me.  He told me he had never had anything personalized before and how much it meant to have his son's birth date on this keepsake.  So sweet, that boy!!  He will be a great dad!

Next up, my neighbor's friend was visiting when I was showing off the Diamonds are a Girl's Best Friend pillow.  Her family is adopting a 2 yo girl and she was busy decorating her bedroom, but couldn't find pillows to match the bedding set she picked out.  She asked if I would make some...of course I would!!  She ran to the fabric store and came back with some satin and trim...


 The chocolate tulle was my contribution.


I know these pictures are horrible...I couldn't get the colors right!!  These are pillow covers with envelope closures that fit an 18" x 18" pillow.  I think they are sooooo fancy!!  Satin is such a tricky fabric...I've got to get better at sewing with it!!  Any suggestions?  Because my next order had a few oops moments...


This  little Flapper style dress is for one of Ms. Priss' friends.  She is in a Theater group, and a had mini production to put on.  I used a pre-made Halloween costume I picked up last year on clearance as a template, but raised the waist to make it shorter.  I want to do that to the costume also...if Ms. Priss would let me!!  It just looks cuter!  Anyway, I stitched and serged the side seams of this satin dress, but the seams pulled in some places and I had to do an emergency "fixya" a day before her show.  Is there something I missed with the seam?  Some special stitch?  You know I'd rather have someone tell me...then to look it up in one of my MANY sewing books...or the internet!!  Lazy, huh? :)  I had fun sewing on the fringe, believe it or not!!  AND I was so impressed with myself for actually getting them STRAIGHT!! HA!  The headband is some 1" sequined trim sewn on black 1" elastic.  I LOVE how the feather came out.  My friend Kathy spent about 20 minutes "curling" it so it would curve just above her head...like a hat!!  So cool!!  For those of you like me who might not know this...you "curl" a feather just like you "curl" a ribbon.  By gently using scissors and scraping down the quill, the feather will miraculously begin to curl!!  But you have to be EXTREMELY gentle, or else risk hacking the feather right off...that's why it took her 20 minutes!!

My last order was placed almost 2 months ago!!!  Gotta love customers who TRULY understand how CRAZY your life really is...thanks Jackie!!  She is one of my family's oldest friends and soooo supportive of me!!  Every time she sees me or calls me, she lifts me UP with her "Girl, you can do ANYthing!!" attitude!!  LOVE her!  So, when I made the ruffled aprons for her daughters, she immediately placed an order for one to give as a birthday gift.


She wanted a strawberry one similar to the one I made for her daughter, but I thought I would change it up a little.  I LOVE these colors!!

This is the fourth ruffled apron I've made, and yet again...used a different method.  I am trying to find one that works best, and has the most "completed" look on the reverse side.  This one by far is the best.  Maybe I'll take photos of the next one I make and attempt a little tutorial??  We'll see.  Well, I have to get to my LIST of things to do...until later...

Sunday, October 2, 2011

My Memories Digital Scrapbooking Software: Review and GIVEAWAY!!

Hello Everyone!! I am really excited about this post!! It is not very often that I get asked to review a product, so when I was contacted by My Memories it took me a couple of days to get over the SHOCK before I even responded!! I mean someone wanted to GIVE me something...for FREE...and then wanted my opinion about it...and then I get to GIVE one of you something...for FREE??!!! How CRAZY is that?? As you can tell, I am still a little in shock! HA!

So as not to disappoint...let's get to it!

My Memories Suite digital &<span class=

I gotta tell ya...I really like this program!! It is very user friendly and so much fun! I've spent the last WEEK playing around with different papers, shapes, and embellishments! I tend to be a little conservative and have a hard time color coordinating, but with this program I found myself overcoming my fear of OVER embellishing! It is just THAT much fun to use!! And when I got confused or overwhelmed by just HOW MUCH stuff this software could do...I just headed to the My Memories Blog where there are a series of VIDEO tutorials that walk you through it step-by-step!! Don't like video tutorial...that's ok, because they also have PDF tutorials outlining the same thing!!

So, before I show you how much fun I had using the My Memories Suite software, I must explain to some of you who may be visiting for the first time...I don't put personal photos of my children on my blog. You may be asking yourself, "so how is she going to show us some examples of this digital scrapbooking software then?" EXCELLENT question...one that I wondered to myself when I was contacted to do this review!! Well, since my blog is all about my SEWING life...THAT is what my review must be about!


What if you were to use the My Memories Suite software to promote your BUSINESS? Flyers for upcoming Craft Fairs...


Something to hand out to local businesses so they can see what products you offer that they may be interested in selling...
Beautiful photo layouts of your handmade products that you can display on your Facebook page or to send out emails! I told you I had A LOT of fun with this software!! :D This one, I think is a stroke of GENIUS...maybe....


Simply print, and attach to a magnetic sheet to give to potential customers!! And lastly, I don't know about you, but when I ordered my business cards from Vista Print...the layouts were somewhat lacking!! Or, because there were only a limited amount of designs that deal with sewing and crafting you are sure to end up with the same as someone else. Now, I can upload my own design to their site and have a unique and original business card...


So what do you think? Too much FUN??!! Now, I'm not going to give you all of the specs and selling points for the software...you can read all about it HERE. But I will give you a quick run down of my pros and cons.

PROS: FUN!! to use, LOTS of papers, shapes, and embellishments already loaded on the program, LOTS of FREE downloads in the My Memories Shop, they are always adding new FREE kits or papers in the Shop also...if they are not FREE then there are always some on SALE for like 99 cents!! And just like in our FABULOUS sewing blogs community there are many generous givers in the Digital Scrapbooking blogs community! I visited a ton of them and got lots more FREE stuff and loads of inspiration! You can easily convert your pages and books to JPEGS, so you can print them ANYWHERE!! Home, Walmart, snapfish, Shutterfly, etc...or you can order Photobooks from My Memories! So EASY!! And you are given lots of choices as to how much resolution to save as, while also adjusting your print image quality.

CONS: There is not much photo editing capability within the software. You can lighten/darken, crop, or eliminate red eye, change to Black & White or Sepia but it is more for a "finished" look, if you know what I mean. For more of a professional look, it is better to use a photo editing program before adding your pictures in. THE biggest Con is that it is a computer disc space EATER!! I mean, we're talking hi-res photos, papers, embellishments...easily ONE page can be in the GBs!! So if you are doing a 15 page Photobook...CHOMP!!! I will be getting my own 2T external harddrive to store all of my Digital Scrapbooking needs!! :) But on the UPside of this, once you convert them to JPEGS the size goes down immensly!!

Ok...so sorry this is getting quite LONG...I'll get to the GIVEAWAY now!!

To Enter: (Sorry, but it's mandatory)
Go to My Memories , TRY to pick your favorite layout, or Digi Pack (I dare ya!)...come back here and comment!! Instant entry :)

*Edited* PLEASE include your email so I will know how to contact you!! Thanks

Now, if you like having options to enter a GAZILLION times...here they are:
Become a FOLLOWER or LIKE any of these

Now, I did like them on Facebook...because when they get to 10,000 SOMEONE will get an iPad2...it could be ME!! I could be 1 in 10,000...and so can you! But, I like the FB page it also has alot of inspiration!

Speaking of Facebook, if we are friends you can see some of the personal Digital Scrapbook pages I did of my kiddos :)

Oh...I almost forgot!!! The My Memories Suite Digital Scrapbooking Software is ONLY $39.97!!! If you don't win this giveaway, but are still interested in buying the program I have an AWESOME Promotion code to give you!! It will get you $10 off of the MMS software AND $10 to use in the Shop!!! Just go to the My Memories website...add the My Memories Suite to your cart and copy/paste this PROMO CODE: STMMMS99372 and you will get it for $29.97 AND have $10 to spend...aren't they AWESOME??!!

The giveaway will run through the week and end Sunday, October 9th 2011 in the evening hours...ya know when the kiddos are in bed and I get to it :D Thanks for participating...I hope my review was helpful!! Good Luck and until later....

Friday, September 23, 2011

Ice Skating Theme Party

So last week was my first born's 9th birthday!! She has known since last year that she wanted an Ice Skating party, but being ME of course I waited until the last minute to get things ready!! Thankfully with the help of my friend, I was able to get all of the decorations and party favors done on time! :D

The invitations went out a week before the party...but most of the girls and parents knew about it before-hand so don't judge! Anyway, I used my Cricut and the SVG file I found last year for the Roller Skate invitation to make this year's invitation. I tweaked it a little with my Sure Cuts Alot software to change it into an ice skate.


Then glued aluminum foil to the "blade" and added the info and a ribbon "lace". Most were blue to go with the theme, but I forgot to get pictures before Ms. Priss scooped them up to deliver to her friends!

I had gotten some comments last year about the SVG file I used. Here is the link to Paper Therapy...a wonderful blog with a generous giver!! It is a SCAL file...so you must have Sure Cuts Alot to use this file with your Cricut!

The day of the party brought everyone to our house first, so I made this wreath to greet them.


So I've discovered yet ANOTHER use for a Pool Noodle!! I bought a bunch of them from the dollar store...clearanced at 50 cents!!! I just bent it into a circle, stuck a stick from the yard into the holes to "hold" it together, and tied some tulle and ribbon to hold it even more. Hot glue will not work...DUH!! I had one of those moments HA! So I will keep working on a better way and let you know!! This noodle was already light blue, so I just sprayed it with some white spray paint and threw iridescent glitter on it to give it a "snowy" look...then just started adding little embellishments with some plain sewing pins. Pretty cool huh?

My friend Kathy came over one day and helped me make tissue paper flowers...


And then went home and painted a sign...isn't she AWESOME??


I know it is hard to see in the pictures, but I also made a couple of "streamers" using blue and silver Mardi Gras beads. I cut a bunch of ice skates and circles then glued them to the beads, along with some pre-cut glitter snowflakes and pom poms. I also did a quick banner using card stock and scrapbook papers, stringing them together with a ribbon.


The centerpiece for the table was this "tree" I made using a branch from the yard, spray paint, glitter, pom poms, and the cut out ice skates and circles.


I used a big Country Time Lemonade can covered with scrapbook paper for the base. I just threw in a bunch more bead strands to weigh it down, then added tissue paper and tulle to hide them.


For the party favors, all of the girls got a little basket of goodies...


The little plastic baskets were on clearance for 25 cents for THREE!! I used the scraps from the tissue paper flowers for filling and made LOTS of these...


I found a tutorial on YouTube to make tulle flowers...here.


So fun...and the girls LOVED them!! They all wore them when we went to the ice skating rink!


And of course Ms. Priss got a tee for her big day...


And she was the only one who sustained an injury...


Right after we put on our skates, she was sitting on the floor and one of her friends skated right over her finger...thankfully the blades weren't sharp!! With some ice and kisses she was all better and on the ice soon after!! A happy time was had by all!!


Now that it is over, I have some orders I am working on, so I will be back soon to share more! :) Until later...

Monday, September 12, 2011

Fun Pillows and Headbands

We've had some birthday parties and free time...can you believe it?? So I worked on some fun things! I am currently working on a Flapper-style fringe dress for one of Ms. Priss' friends, so I have loads of black satin scraps laying around. For this Birthday Girl, who had nothing specific she wanted me to make her, I decided to go Girly!! Inspired by the black satin, I made this "Diamonds Are a Girls Best Friend" pillow for her totally pink and girly room.


The back of the pillow is a silky soft fabric that I've used for other pillows and a nap map! I think it is just perfect for a 10 year old girl! :D

For the other Birthday Girl, who DID have something specific in mind, I made this My Little Pony inspired pillow.

Her favorite MLP is Rainbow Dash, so I googled it...not knowing much about MLP and found a free SVG file for my Cricut!! It cut out the paper "pattern" and I used that to cut the fabric! I used flannel for the pony's body, and rainbow fleece scraps for the mane and tail. I used fabric paints for the eye, rainbow emblem, and little heart on the front leg. The pillow is a lime green fleece, with a sheer rainbow ribbon on the end for fun!! It was a little work, but I am happy with how it came out...especially because when I was told the request, I had NO idea how to make it!!

I did this quick headband for her also...


And just kept making them...


The above headband was made using the ruffles I took off of The Middle Child's red shirt, before I added the UL applique.


I found this really cool blog that had such adorable bow and headband tutorials....and made these!! Of course, theirs are much cuter...but my girls and their friends were happy with mine! ;)


These are on little clips. The one in the middle was made by Ms. Priss using Kimara and Michelle's awesome pattern...check out Wee Folk Art for more inspiration with felt!! She is also running a newbie knitting lesson series right now, if you are interested!!


And lastly, Ms. Priss' teacher asked that "since you sew..." could I make her a valence for the window in her class room. How can I resist when she handed me a piece of fabric?? I provided the tulle!

Every 2 years our Teachers come up with a learning theme. This cycle's theme is WILD about Learning, and all of the teachers decorated their classrooms and hallways with fun animal prints, trees and vines, and lots of cute animals. I wanted the valence to be versatile and decided to make it reversible instead of simply adding a liner.


Fleur de Lis are ALWAYS popular in Louisiana!! :)


Well, that is all for now! Hope your school year has started off great!! Until later...

Tuesday, September 6, 2011

More Back-to-School Items

I hope you all had a nice relaxing Labor Day! Our plans for the beach were cancelled due to Tropical Storm Lee...UGH!! Although my Momma and siblings were die-hard beach go-ers, I opted to not make that trip! So instead I stayed home and watched the Star Wars marathon on Spike TV...YAY!!! Love Star Wars!!

Anyway, now that my children are back in school I finally have time to post some of the items I completed! I FINALLY tried Made's tutorial on fusing shopping bags! I wanted to do it for a teacher's bag at the end of last school year, but never got around to it! Thankfully, I did start saving up a lot of plastic bags! And when I saw what Alexis over at Made By Lex did with her fused bags, I knew it was time to gather my collection! I give you my adaptation of The Recycled Lunch Tote...


Instead of just plain white, I had several colored bags! So I opted to not do too much embellishing, other than their names.


The fusing was a little tricky, and mine wasn't as smooth as theirs...but I kind of like the "crinkled" look. I just fused, cut into squares and rectangles, then serged. I did go back with my sewing machine to reinforce my seams. I know that many of you will sew first, then serge...but I like to use my serger first, not sure why! I used heavy duty stick-on Velcro for the closure. It adhered well, but make sure if you use them to put them where you want them...they bond quickly and you DO NOT want to have to try to remove them!!!


The yellow one is bigger than the blue one...not as many blue bags!! But I did figure out that since you are using so many "layers" to fuse, it will work just as well to put plain white bags in the middle layers with the colors on the outer layers. This way you will have more "yardage" of colored bags! Oh, for the names...I used scrap fabric to cut the letters then used clear contact paper to cover/ protect them. I did a tight zigzag to stitch it to the tote! So far it is working out pretty good, and the letters are staying clean and dry! Although I know these totes aren't very insulated, I really like re-using something that would otherwise end up in the trash. Another good recycled project is using cereal boxes for fun place mats!


I did these Back-to-School place mats for the kids. I used the aforementioned cereal boxes, scrapbook paper, and contact paper...patterned and clear! Cute, huh?


When The Boy got his school tote bag I knew EXACTLY what I was going to put on it...


The machine embroidered font is BONES...love it!! I used my Cricut to cut out some dinosaur shapes on paper, then used them to cut felt...my Cricut won't cut felt...no matter HOW HARD I try!! :( Then I just hand stitched them to the bag with crochet thread! He LOVES it!! The camo ribbon added just a little more color...without being too girly! ;)


Okay...so I think secretly, I am an OVER-achiever...is that even possible when you are as in-exact and as FAR away from being a perfectionist as I am??!! I just don't understand WHY I would poke my hand up for being my kindergartner's ROOM MOM!! I mean last year I was CO-room mom, but that was third grade...they don't do anything in third grade!! But in Kindergarten there are TONS of things that need to be done all.year.long!! And on TOP of that...I said yes to my friend Kathy when she said, "hey, let's do a TENT for Symposium this year"!!!!! Ya'll I seriously think I am OUT OF MY MIND!!! See what happens when I get a wee bit of freedom? I mean, the Boy is only in school for a couple of hours on Tuesdays and Thursday...but here I am going CRAZY!! :)


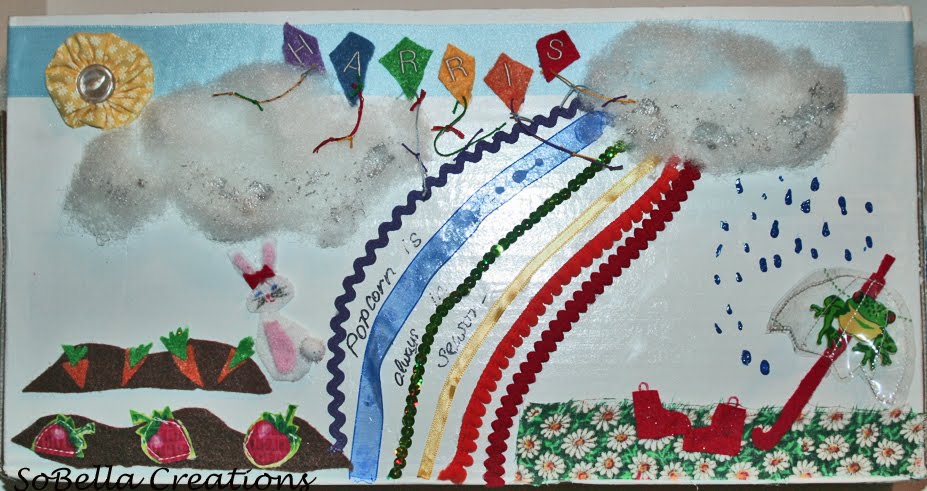
Anyway...my Room Mom duties have already begun, pretty easy stuff so far. But on first encounter with the teacher I get, "so...I hear you are kinda crafty?" So I was given the task of decorating her Popcorn Box. The PTC sells popcorn one Friday a month, and the teachers have cardboard boxes to carry all of the orders to their classrooms. It has seem in the recent years to become a "thing" to decorate their boxes. My friend Kathy is an AWESOME artist and painter!! She did the boxes for two of her daughter's teachers...good stuff!! I knew there would be NO WAY that I could draw book characters like Skippy Jon Jones, Ramona, or Alice in Wonderland...so I had to stick with what I know...fabric and felt!!


I really didn't have a CLUE what to do on her box, but since they teach the Season's in Kindergarten and there are four I chose that! A Season for every side of the box. The one above is Spring. I know the writing is hard to see, but it says "Popcorn is always in Season"! I machine embroidered her last name in the kites.


Here is Summer..I know my flag is backwards, please forgive!

The clouds are polyfil, and the beach is sandpaper.

Fall is my favorite...


And lastly, Winter...


I was really happy with how it came out. It took me about two good days to get everything on, then another to spray on a clear Mod Podge to protect it.


Oh...I also added a grosgrain strap for easy carrying.


Hopefully everything stays on...we'll find out in a couple of weeks when the first Popcorn Day rolls around! :)


So I know this post is sooooo long, just one more thing before I go. Friday was "Paint the Town Red" Day to honor our local college's first football game. I did a shirt for Ms. Priss last year, so I just needed one for The Middle Child.


So now I'm done!! Thanks for hanging around until the end ;) One more shout out to my Daddy...yesterday was his birthday!! Hope you had a good one Daddy, we'll see ya soon!!! Until later...

Thursday, September 1, 2011

LSU Crib Set Order

Well, I think I am happy with how the ol' blog is looking...so it is no longer under construction. :D

So here is the order I got from someone who lives in Baton Rouge!! She and her husband drove all the way here to Lafayette to pick it up...so sweet!! They saved me from the Post Office...YAY!!!


This was my first attempt at a crib bumper, and it was somewhat challenging! But in the end, I was pretty happy with it...and so was the expecting Momma! I used foam padding instead of batting to make sure it was good and firm. I used the tutorial, so generously offered at Craft Hours, but obviously not patchwork...it was work enough with just a solid piece of fabric, whew!! And thankfully, this is what my customer preferred. Anyway, I was able to get through it and think the next time will be easier. Isn't that always the way?


The quilt is just 6" squares sewn up with my signature wonkiness *ahem*, with some machine embroidery sprinkled around on the solid pieces. The paw print squares are fleece, and the backing is a solid flannel. It ended up measuring approximately 40" x 60", which is the perfect fit for when the crib gets converted to the toddler-sized daybed.


And there you have it, enough cuteness to turn any baby into an instant FAN!!! Geaux Tigers!!

I am very humbled when someone happens upon my blog and likes what they see enough to place an order with me! Thank you so much Dawn for being patient with my 50 questions and also for the time line you gave me to complete it! :) As most of my sewing friends know, starting and completing projects with small children is a task within itself. Add in the fabric and materials collecting and the process and labor itself...whew, miracles are happening!! ;) It makes me really appreciate the patience I receive from customers AND my family!

Anyway...if someone else is "happening" on my blog someday and is interested in placing an order, this crib set with LSU team fabric and specialized monogramming is priced at $200. It comes with bumper, skirt, and an approximate 40" x 60" quilt. Fabrics will vary with availability, but we can talk about that later....hence the previously quoted "patient with my 50 questions"!! :D

Hope you all have a safe and fun-filled Labor Day weekend, I am off to the beach!! Until later...