Showing posts with label for the home. Show all posts

Wednesday, December 21, 2011

Ready for Christmas....ALMOST!!

Today is the first day of my children's Christmas break, and I NEVER thought I would feel....RELIEVED!!! With all of the Christmas programs, class parties, and just general running around I've been doing, I am happy that for the next couple of weeks I have NOWHERE to go and NOTHING to do!!  Well, except for family Christmas celebrations and gifts that still need to be made...is it really only FOUR days until Christmas??  I've got to start SEWING...GAH!!!  So this is what I've been doing for the last couple of weeks...oh, as usual it is kinda photo heavy!  :)

I know they have some fancy intros, and blog buttons that you can use....but I have NO TIME for all of that!!  SO...this is my version of I MADE SOMETHING THAT I SAW ON PINTEREST...


I have lots of the really thick cardboard left over from my Symposium tent...I am putting it to good use!!  I cut out my ornament shape, primed the cardboard, then used Tempera Paint and glitter glue.  I was going to use some fancy lettering, but ended up with a Sharpie instead! :)  I'm really happy with how it turned out...now I just need to spray it down with a clear sealer before I store it!

Next I converted my Literary Pumpkin into a Christmas tree.


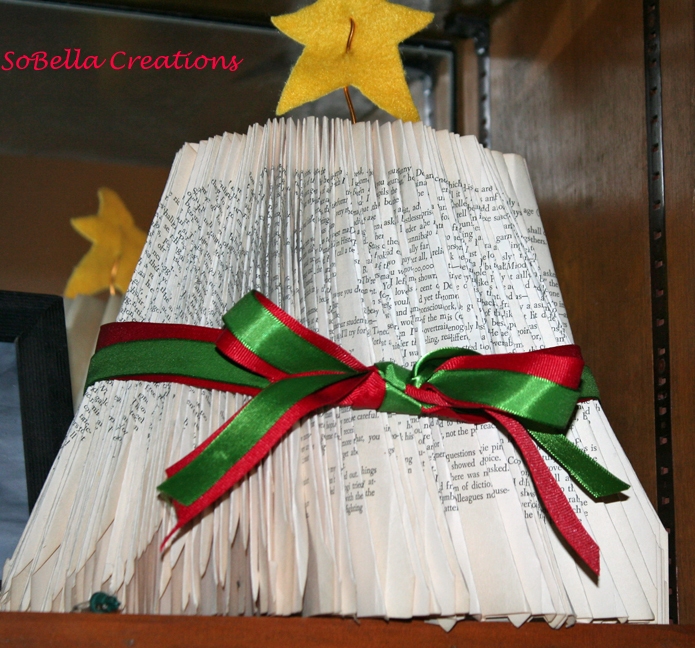
I did it really fast, so my pages aren't exactly folded evenly...oops!  I was moving from project to project so quickly...and my dining table was ALWAYS filled with crafts in various stages of completion!  Thankfully, Ms. Priss' fourth grade teacher is a little crafty herself...so I didn't have to come up with this project OR go to school to help do it!!


Don't you just LOVE it?  So simple, but so sweet!  Not our Elf, Rex...he just liked hanging out on the cool wreath that Ms. Priss made.  It is a wire coat hanger, approximately 300 sandwich baggies...the ones that fold over, not zip, and a sweet little velvet bow!!  I LOVE crafty teachers that think outside of the paper and foam box!! :)  I made up some treats for the class...also ASOP (as seen on Pinterest!).


The original printable called them Grinch Pills!  I didn't really want to use "Pills" in anything I was giving to children..so I came up with my own saying...


I used a free SVG file and my Cricut to cut the "boxes", then Ms. Priss glued on the label.  Her class loved them!  The fourth grade hallway celebrated a Cajun Christmas.  All of the parents were asked to send in a food that was native to Louisiana...of course I made a King Cake...


A CHRISTMAS King Cake!! :)  And for the Teacher's gift...a bunch of things I've been wanting to make, but never have...thanks SMS for compiling some AWESOME tutorials :)


They were so FAST and EASY to make that I did the same for The Middle Child's and The Boy's (not pictured) teachers...

As you can see, I didn't have the fancy key FOB hardware, so I just used two key rings!  I couldn't find them locally and had no time to wait for an internet order!!  The Middle Child's Substitute Teacher didn't get the Channeled Rice Therapy bag...I was already doing TONS for her and running out of time!   I did mention that my daughter's Kindergarten teacher is out on Maternity Leave, right?  Well, that left our Sub to do ALL of the Christmas programs and parties...and not knowing really what/how to do it!!  Enter the most AWESOME Room Mom EVER...HA!  More like the CRAZY person who thinks she can do it all....so I send a letter to all of the parents telling them that I am HI-JACKING the class Christmas party!!  I planned and bought all of the craft supplies, and they just needed to send snacks!!

The first craft was pretty easy...Jingle Bell necklaces.


But I didn't like the idea of just plain pony beads, so we used wooden beads and some snowflake buttons.  I also found some metallic stretchy cord, which I liked better than any other alternative.

The next craft was a little more work...for me and the class.


They were originally supposed to make a Christmas tree centerpiece using sugar ice cream cones, icing, marshmallows, M & Ms, gum drops, etc...but I thought that would be WAY too messy and time consuming! So I googled some other options and came up with this 3D paper version.  It is a sheet of green cardstock cut in half width-wise, then stacked together and folded to cut a symmetrical tree-shape.  Once the tree was cut, I sewed a straight stitch down the middle to make it stand on its own.  We used foam stickers, sequins, glitter glue, and strands of Mardi Gras beads to decorate it!!  It took the longest for the class to craft, but still much better than ICING a cone!! :)

The last craft was more involved for me, but I figured there are enough paper and foam ornaments on my tree and wanted something a little more sturdy.


This is the back side of the ornament.   This was another ASOP project that I thought was just too sweet not to do.  The materials used are aluminum can lids...cut using a safety can-opener which leaves a nice smooth edge, scrapbook paper, mod podge, and various trims hot-glued around the edge! There is also a picture of the child that is on the front of the ornament.  Can I tell you HOW IMPORTANT it is to have a good CIRCLE cutter for this craft!!  I bought the Martha Stewart one at JoAnns using a 40% off coupon!  It really saved time and my SANITY!!  I did mostly ALL of the preliminary for this craft...I didn't really want to be sitting in class hot-gluing ANYTHING...so all the class had to do was write their name and the year on the back and glue their picture on the front! :)

After all of the crafting, the class had just enough time to play a game...Pin the nose on the Snowman!


The Boy's Pre-school had a Happy Birthday Jesus party where Happy Meals from McDonald's were brought in...so I had NOTHING to do for them...except make a couple of initial ornaments for The Boy to pass out!


Notice how mostly ALL of my pictures only include the craft for my child??  That's because this momma was so busy making sure everything got done on TIME, that I forgot to grab my camera to snap pictures of all the prep work covering my table...GAH!!  Oh well, when you are trying to do it ALL...like a CRAZY person, I guess somethings gotta give!!  HA!

Ok...so this last item was done for a friend who needed it before Christmas...some jeans that her daughter outgrew in length!


I've never done a TRIPLE ruffle before...what a PAIN!!  Looks cute though.  Here is why it was needed before Christmas...


It needed to match this shirt, but also be wearable after Christmas.  She chose the colors, because those are the colors her daughter mostly wears...whatever works...right?

So...FOUR days until Christmas and I have about TEN gifts needing to be cut, sewn, and monogrammed...then of course WRAPPED!!  Think I'll make it??  Here's hoping we all have a VERY MERRY CHRISTMAS!!!  Until later...

Monday, October 24, 2011

Halloween Decorating Fun!!

 Halloween is almost upon us...are you ready??  I think I am just about done with the house decorating, now to get my kids costumes done!!!  I've been up to my eyeballs in finishing up the cardboard cutouts and banner for The Middle Child's Nursery Rhyme Day!!  All that is left to do is the actual character painting...and thankfully my friend Kathy, the artist will be here later to help me!!  More on those later...back to Halloween decorating!!

I have had little spurts of free time here and there, so I've been checking out what's happening around our crafty little blogosphere.  Have you seen the Literary Pumpkins?  LOVE them!!  I found an old book under my carport...must have fallen out of the Goodwill box!!


I chose not to put a jack-o-lantern face on it, just a couple of pretty little ribbons...


Over at Craftaholics Anonymous I found these little cuties...


Loved them so much I cut up TONS of paper strips and circles so our GS Junior Troop could do some at our last meeting!!


And thanks to my sweet and so TALENTED friend Melanie...I've become obsessed with these wire pumpkins...


The big one was purchased a couple of years ago...the smaller one is the one I made using some floral wire from JoAnns.  But, of course, I didn't stop there...


The bright orange one is using jewelry wire...


Then I tried wired ribbon!!!  See OBSESSED!!  Did ya see the little coppery one?


Fancy huh?  My obsession was really RESEARCH, see my friend Kathy and I were going to do this craft with Ms. Priss' fourth grade class, and we needed to find the cheapest alternative!!  So we went to Home Depot...


and found Copper Cerrowire!  $12 for this 250 ft roll!!  It is not just one big wire, it is several strands wrapped together...sorta like embroidery floss.  So once the pumpkin was coiled and spread, we just separated the individual strands to give it the full effect!!  Cool, huh?  So anyway, the teacher got lots of chenille stems and the students ended up using those instead...but we had fun at Home Depot anyway!!! :)


Do you know you can get Drywall Tape in a variety of COLORS??  It looks just like BURLAP....see??


Doesn't it look like BURLAP??  And it is sticky...so you don't have to use any glue to get it on the wreath form, which by the way is another pool noodle spray painted black!!!  I was so tired from all of the cutting I did this weekend that by the time I got to finishing my wreath I was literally picking up scraps from my sewing room FLOOR!!!  See the VERY scrappy burlap flowers and bow...from the floor!!  And my ghost??  An old dryer sheet that somehow ended up in my sewing room...not sure how or when since I've been using the Downy Dryer Bar for like 8 months now!!!  So I am happy with it...I wanted it to me minimal since I plan on taking everything off and making it into a Fall Wreath as soon as Halloween is over!!

Now the one I did for my Momma....NOT minimal...


Lots of tulle and some ribbons!!  I think it looks like a big ol' piece of candy!! HA!

Well, still lots to do, so I will leave you now!!  Back later with completed costumes...hopefully!! :)  And LOTS of Nursery Rhyme Day things to show you!!  Until later...

Friday, October 14, 2011

Orders Filled!!

While my giveaway was going on...I was busy finishing up some orders.  And since then, I've managed to pick up a few more!  WHEW!!  I am so grateful for the extra income, but it sure makes me SUPER BUSY!!  This week has been one of the busiest by far!  And that is with NO SEWING projects involved!  Between TWO field trips, one Dr. appointment, preparing and having my first GS Daisy meeting, and preparing for my month to do a craft with my daughter's GS Junior Troop...I have been on-the-go EVERY day!!  So today I have vowed to stay home in my PJs ALL DAY!!!  Not that I am not still busy...finishing up the Junior Troop's craft preparations, a birthday hat order, a banner for my Kindergarten teacher's upcoming Nursery Rhyme day, some Nursery Rhyme character cut outs for my Symposium Tent...that my Kindergarten teacher will also use for props, and LAUNDRY!!  Lots and LOTS of LAUNDRY...GAH!!  I feel a few more gray hairs growing in as.I.type!!

Anyway, enough with all my yanh-yanhing!!  On with the orders I've manage to complete...


One of my Big Boy's best friends became a proud Poppa at the end of last month, and my son was named "Godfather".  He placed this order at the last minute...what? OF COURSE I made him pay me!!  My time is money...even for my children...HA!  But believe me, he got a HUGE discount! ;)


This is a 30" x 30" palette "quilt" with no batting, but a fleece backing.  The baby's name and birth date were quickly machine embroidered...when I got the information!  I really like how the paw prints from the fleece show through to the front!


I added a little initial applique burp cloth...for no charge!  The daddy was sooo excited about his new little baby's gift, that he called to thank me.  He told me he had never had anything personalized before and how much it meant to have his son's birth date on this keepsake.  So sweet, that boy!!  He will be a great dad!

Next up, my neighbor's friend was visiting when I was showing off the Diamonds are a Girl's Best Friend pillow.  Her family is adopting a 2 yo girl and she was busy decorating her bedroom, but couldn't find pillows to match the bedding set she picked out.  She asked if I would make some...of course I would!!  She ran to the fabric store and came back with some satin and trim...


 The chocolate tulle was my contribution.


I know these pictures are horrible...I couldn't get the colors right!!  These are pillow covers with envelope closures that fit an 18" x 18" pillow.  I think they are sooooo fancy!!  Satin is such a tricky fabric...I've got to get better at sewing with it!!  Any suggestions?  Because my next order had a few oops moments...


This  little Flapper style dress is for one of Ms. Priss' friends.  She is in a Theater group, and a had mini production to put on.  I used a pre-made Halloween costume I picked up last year on clearance as a template, but raised the waist to make it shorter.  I want to do that to the costume also...if Ms. Priss would let me!!  It just looks cuter!  Anyway, I stitched and serged the side seams of this satin dress, but the seams pulled in some places and I had to do an emergency "fixya" a day before her show.  Is there something I missed with the seam?  Some special stitch?  You know I'd rather have someone tell me...then to look it up in one of my MANY sewing books...or the internet!!  Lazy, huh? :)  I had fun sewing on the fringe, believe it or not!!  AND I was so impressed with myself for actually getting them STRAIGHT!! HA!  The headband is some 1" sequined trim sewn on black 1" elastic.  I LOVE how the feather came out.  My friend Kathy spent about 20 minutes "curling" it so it would curve just above her head...like a hat!!  So cool!!  For those of you like me who might not know this...you "curl" a feather just like you "curl" a ribbon.  By gently using scissors and scraping down the quill, the feather will miraculously begin to curl!!  But you have to be EXTREMELY gentle, or else risk hacking the feather right off...that's why it took her 20 minutes!!

My last order was placed almost 2 months ago!!!  Gotta love customers who TRULY understand how CRAZY your life really is...thanks Jackie!!  She is one of my family's oldest friends and soooo supportive of me!!  Every time she sees me or calls me, she lifts me UP with her "Girl, you can do ANYthing!!" attitude!!  LOVE her!  So, when I made the ruffled aprons for her daughters, she immediately placed an order for one to give as a birthday gift.


She wanted a strawberry one similar to the one I made for her daughter, but I thought I would change it up a little.  I LOVE these colors!!

This is the fourth ruffled apron I've made, and yet again...used a different method.  I am trying to find one that works best, and has the most "completed" look on the reverse side.  This one by far is the best.  Maybe I'll take photos of the next one I make and attempt a little tutorial??  We'll see.  Well, I have to get to my LIST of things to do...until later...

Monday, September 12, 2011

Fun Pillows and Headbands

We've had some birthday parties and free time...can you believe it?? So I worked on some fun things! I am currently working on a Flapper-style fringe dress for one of Ms. Priss' friends, so I have loads of black satin scraps laying around. For this Birthday Girl, who had nothing specific she wanted me to make her, I decided to go Girly!! Inspired by the black satin, I made this "Diamonds Are a Girls Best Friend" pillow for her totally pink and girly room.


The back of the pillow is a silky soft fabric that I've used for other pillows and a nap map! I think it is just perfect for a 10 year old girl! :D

For the other Birthday Girl, who DID have something specific in mind, I made this My Little Pony inspired pillow.

Her favorite MLP is Rainbow Dash, so I googled it...not knowing much about MLP and found a free SVG file for my Cricut!! It cut out the paper "pattern" and I used that to cut the fabric! I used flannel for the pony's body, and rainbow fleece scraps for the mane and tail. I used fabric paints for the eye, rainbow emblem, and little heart on the front leg. The pillow is a lime green fleece, with a sheer rainbow ribbon on the end for fun!! It was a little work, but I am happy with how it came out...especially because when I was told the request, I had NO idea how to make it!!

I did this quick headband for her also...


And just kept making them...


The above headband was made using the ruffles I took off of The Middle Child's red shirt, before I added the UL applique.


I found this really cool blog that had such adorable bow and headband tutorials....and made these!! Of course, theirs are much cuter...but my girls and their friends were happy with mine! ;)


These are on little clips. The one in the middle was made by Ms. Priss using Kimara and Michelle's awesome pattern...check out Wee Folk Art for more inspiration with felt!! She is also running a newbie knitting lesson series right now, if you are interested!!


And lastly, Ms. Priss' teacher asked that "since you sew..." could I make her a valence for the window in her class room. How can I resist when she handed me a piece of fabric?? I provided the tulle!

Every 2 years our Teachers come up with a learning theme. This cycle's theme is WILD about Learning, and all of the teachers decorated their classrooms and hallways with fun animal prints, trees and vines, and lots of cute animals. I wanted the valence to be versatile and decided to make it reversible instead of simply adding a liner.


Fleur de Lis are ALWAYS popular in Louisiana!! :)


Well, that is all for now! Hope your school year has started off great!! Until later...

Wednesday, July 13, 2011

Summer Lovin'....Having a Blast!

Did I ever mention that July is the MONTH of Birthdays around here? Ok...not the MONTH, but for sure the WEEK!! :) Well, I guess if I am to be accurate, I must start the last week of June! So here goes: my baby sister 6/24, my cousin 6/26...we also just added a new bundle of joy through my SIL's sister on the 26th (congrats girl), my BFF 6/27, my OLDER sister 7/3, my niece also 7/3, my Middle Child 7/4 hence the patriotic bday banner above, one of our oldest family friends 7/5, my sweet Momma 7/6, my cousin's daughter 7/7...which also happens to be my awesome man's and mine anniversary, 10 YEARS...YAY!! See...now how is one LAZY momma supposed to keep up with all of those birthdays and events???!!! Lots of rain checks, and "I'll have them for you soons!!" obviously!! HA!


So where to begin....oh, of COURSE. My sassy Middle Child turned FIVE!!!


I first saw a pair of cuffed bloomers over at No Big Dill, do you read that one? She is soooo talented, and with FIVE girls and one on the way HOW on EARTH does she manage to do everything she does???!! Anyway, I thought they were so cute that I knew that is what I wanted to do for my Birthday girl!! The pattern for the bloomers are from Clever Charl0tte, but of course I had no time to order and wait for a pattern and I set out to "figure them out" on my own! Not as cute as the pattern, but sweet enough for me!!


And about the banner....it is pretty pitiful of me for JUST getting around to doing this...I mean, she turned FIVE!!! HA! Burlap, fabric scraps (right AND wrong sides of a deco weight woven), and felt!!


Of course being the 4th of July, the siblings needed outfits also...


Flat-front shorts for The Boy...tutorial courtesy of Dana at MADE, don't know why I haven't tried that one before.....AWESOME!!! And they fit like a dream!!!


And for Ms. Priss...sorry, this is the only photo from the day with the outfit on! As you can see, she just threw it on over her swim suit!! (oh...and don't you LOVE the popsicle in her mouth, smoke bombs in her hand, and she is shoving a box of firecrackers in her pocket...PRICELESS!!)


The skirt is pair of old worn out jeans from my awesome man!! It was supposed to be a skirt for me, but I got a little rip-happy and tore the bottom to short!!! So as not to waste, I figured out how to make it fit Ms. Priss. Sorry, no pictures but try to imagine....cut down side seams in a "V" like pattern about 2 inches, the back waistband happened to be sewn like a casing so I fed about 10" of elastic through and stitched in place. Then I used a ladder stitch to sew up the cut side seams. It fit pretty good, but next time I will probably go ahead and cut about 2 inches away from both side seams all the way down, it would make the skirt less flared! I added a couple of hearts with the coordinating fabrics on the front and back of the skirt, and also the tee shirt to snazz it up!! Hope you all had a Happy 4th!!


So for Father's Day, or as my Daddy would say...The THIRD most HOLIEST of all Holidays, after Easter and Christmas of course... I made him another Poppie tee!


I know it is hard to see, and I most definitely should have used a solid fabric, but it says Poppie's Cowpokes on the red horseshoe fabric!! Of course I moved the pocket down to where my Daddy likes it!! :)


And for my Momma, an embellished Cover-up!


They're supposed to be flip flops...can you tell?


I have a flip flop machine applique for my Embroidery machine that would have probably looked much neater....but I wanted to try the hand-cut frayed look...don't worry, she'll let me know how it works out!! ;)


I should stop this post now...I know it is getting to be SUPER long, but I do have a few more items to share!! I am also in the process of shoveling out my sewing room and re-organizing it...yet AGAIN!! But I just acquired a pretty cool desk from our 23 yo who just moved OUT!!!! YAYAYAYAYAY!!!! Anyway before I get penalized for excessive celebration...I think I WILL end this post and HOPE that I will be back in a couple of days to finish sharing what I've been doing this summer...besides being LAZY!!! ;D Until later...